How to make a Flush Cut Saw
A flush cut saw is a saw that is completely flat on one side. This lets you rest it against a piece of wood and cut something, e.g. a tennon, completely flush without sctratching the wood surface.
This can be kinda handy and save a lot of time.
To make one, you need an old saw that is fairly flexible, and that has teeth that can be sharpened. You also need a piece of wood for a handle.
Making the handle
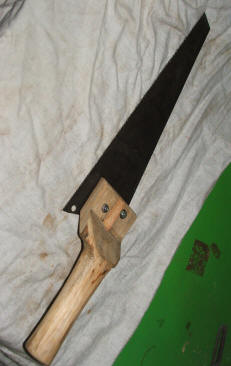
I was lucky to have a piece of European black pine fall into the back of my car one day that was the perfect size. First step is to cut a piece about a foot long, and then, if you are using a piece of round wood as I was, cut a flat face. The flat face will be the bottom of the handle. Then slice the blank in half for two thirds of its length, making sure that the cut stays parallel to the cut face. Turn the blank 90o, and then make two more length ways slices. cut off the waste, and you should be left with a handle between 15 and 30cm square (pick a size just a bit to big to be comfortable).
Next, cut the step at the front. The only real concern is to leave enough wood to create a handle that won't break. Once this is done, mate the handle to the saw blade and trim it to fit.
The final step is to shape and round the handle. A spokeshave works well to round off the handle, with a rasp and chisel reaching anything that the spokeshave can't reach. Then give it a good sand and you are done.
Sharpening the saw
If the saw blade is already sharp, file the set off the bottom set of teeth until the bottom of the blade is perfectly flat. If the saw is blunt, sharpen it first (there are plenty of good guides on the web if you are not sure how), then file the bottom flat.
Assembling the saw
The last step is to attach the handle to the saw using countersink head bolts, and then file them completely flat, and the saw is ready for testing