How to sharpen Metalwork Files and Woodworking Rasps
Good, sharp tools are a pleasure to work with. So what do you do when you have a drawer full of old, blunt files? Well, you can ‘rebirth’ them (the scriber you will see below is an old chainsaw file that I tempered and ground back). You can also resharpen them with minimal effort, restoring them to a surprising degree. And doing this is as easy as resharpening a blunt chisel.
Is your file clogged and dirty?
Clean it. You can use a file card or wire brush to do this in the first instance. Some writers say that a file card or wire brush will, over time, add to the bluntness of a file (the wires in brushes and cards is high carbon steel as well). This is not an issue if your file is already blunt. What is an issue is that if your file is as badly clogged as this one, file cards don't do a very good cleaning job in my experience.
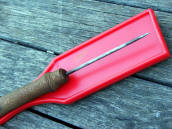
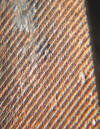
I have used a rotary wire brush on my drill on badly rusted and clogged files, but have found that nothing beats going through the teeth of the file one by one with a scriber. (I made the one here by loading an old chainsaw file into my drill and running it agains a grinder.) The Photos below show the same file before and after cleaning.


Is the file a candidate for sharpening?
Files stop cutting because: 1. the grooves are full of crap and can’t hold any shavings 2. the file is so badly clogged that the teeth can’t contact the metal at all 3. the teeth are blunt 4. the teeth are broken or chipped
You can tell if your file is blunt because 1; it doesn’t cut as well as it used to, and 2; the cutting edges are shiny (See the photos above for an example)
How does Sharpening work?

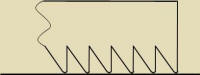
The teeth on a sharp file have a profile something like:
They work by creating a high pressure point, and ‘dimple’ under each tooth. This effectively causes a microscopic bulge of metal to push up ahead of the tooth. This principle is the same as what a centre punch does – push metal away from the point of impact. The tooth of the file then pushes forward and scrapes off the ‘bump’it created. This is one of the reasons that soft metal is easier to file than hard metal.
If the teeth are rounded over (blunt), the point of pressure is spread over a wider area and effective pressure is reduced, reducing the files’ effectiveness. The angle of contact between tooth and metal is also reduced, reducing the scraping action. This is why you need more force to make a blunt file cut.
Enter the acid. There is some conjecture as to why this works, but it does work well enough for several successful businesses to offer file sharpening services. One view is that the acid attacks the wall of the tooth more aggressively than the point – and I can see some merit in this argument. I also suspect that the acid removes any burrs from the teeth as well as creating small pits in the surface of the metal, creating ‘micro’ teeth. This last point would also help explain why you can only resharpen a file a few times.
What Acid should I use?
A quick read around the web shows that most of the common acids have been tried with success. Two easy to get acids are Sulphuric acid (old car batteries) and Hydrochloric acid (Pool supplies). These can work quickly, but require diluting and can also be dangerous if used carelessly. The strength of the Sulphuric acid will vary a lot between batteries, so you will need to test your files every 10 or 15 minutes until you have an idea of how strong your acid is. Various comments on the web also suggest that the fumes from Hydrochloric acid will cause everything else in your workshop to go rusty – so be warned.
Two much more forgiving options are rust dissolver (phosphoric acid), and vinegar, mainly because it doesn’t matter so much if you leave the files in solution for an extra day or so. I would use the rust disolver (not rust converter) on files that were too fine to clean with the scriber, but haven't got around to it yet - I'll post a bit more when I do.
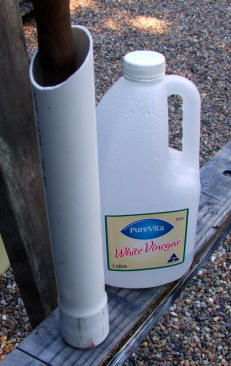
So. How strong should you make the solution? If you use vinegar – drop it in neat. A quick search on the ‘net will give a wide variety of strength vs. time recipes for most of the common acids. Key point is; the number of molecules of acid in your bath controls how many molecules of metal the acid can etch away before it is completely denatured. Once the acid is dead, it can do no more good and little harm. (A stronger acid requires timing because you don’t use up all the acidity in the solution)
No matter what acid you use, you will have to rinse the files thoroughly after treatment, then dry them. When you mix a metal and a strong acid, you end up with hydrogen gas and a salt. For instance, if you mix sulphuric acid and copper you can get copper sulphate whilst mixing metallic sodium and hydrochloric acid gives sodium chloride (and fireworks, but that is another matter). Leaving any trace of salts on the file will accelerate rusting and negate the effects of your sharpening. (Vinegar is also good in this respect as its chemistry is more complex)
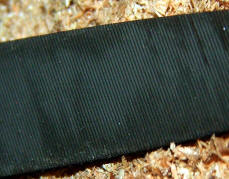
So, does it actually work?
Yes it does, with the following caveats. It ain’t never gunna turn that there piece of flat steel back into a file, period. And resharpened files are never quite as sharp as a brand new one. This photo is the same (15 year old) file shown in the before and after series above. It started out as 'moderately' blunt, and came out of a two day soak in about 250ml of neat vinegar with a ‘hey, I’m really impressed with this’. It did turn black, and whilst I’m not 100% sure of the chemistry, I suspect that this is a form of oxide that can inhibit more serious rusting, so I plan to leave it alone.
How can I keep my files from going blunt again?
Ok, you have just invested an afternoon restoring your favourite file. Now what?
First, if you want to make it go blunt real quick, just toss it back into your draw of other files where they can all rub together….
If you have a drawer for your files, cut two or three pieces of wood to fit your drawer, and cut slots so you can drop your files in on their edges. If you don’t, you can cut three bits of wood and glue/screw them together into a shape resembling a ‘H’. Cut some slots down each side and you now have a file holder that sits on your shelf. If you only have half a minute to spare, cut a piece of cardboard and roll it up into a sheath. (This is also great for all those ‘extra’ files.)
When you use your file, give it a quick regular clean while in use and pick out any stuck chunks before they get totally stuck. Also keep a small piece of triangular shaped hard wood (bamboo is supposed to be good too) handy, and push the file across the wood so that the teeth cut little grooves into the wood, and a section of wood is shaped to a mirror image of the file. This turns the wood into a comb, and cleans out all the rubbish from the grooves.
Lastly, if you are worried about rust then give each file a coat with WD40 or similar. Pro’s claim that oil will stop your file from biting into the metal – my theory is that rust will too, and 30 seconds of use wipes the oil off the cutting edges.